How to draw an isometric drawing, step by step
Kallydo team · · Updated
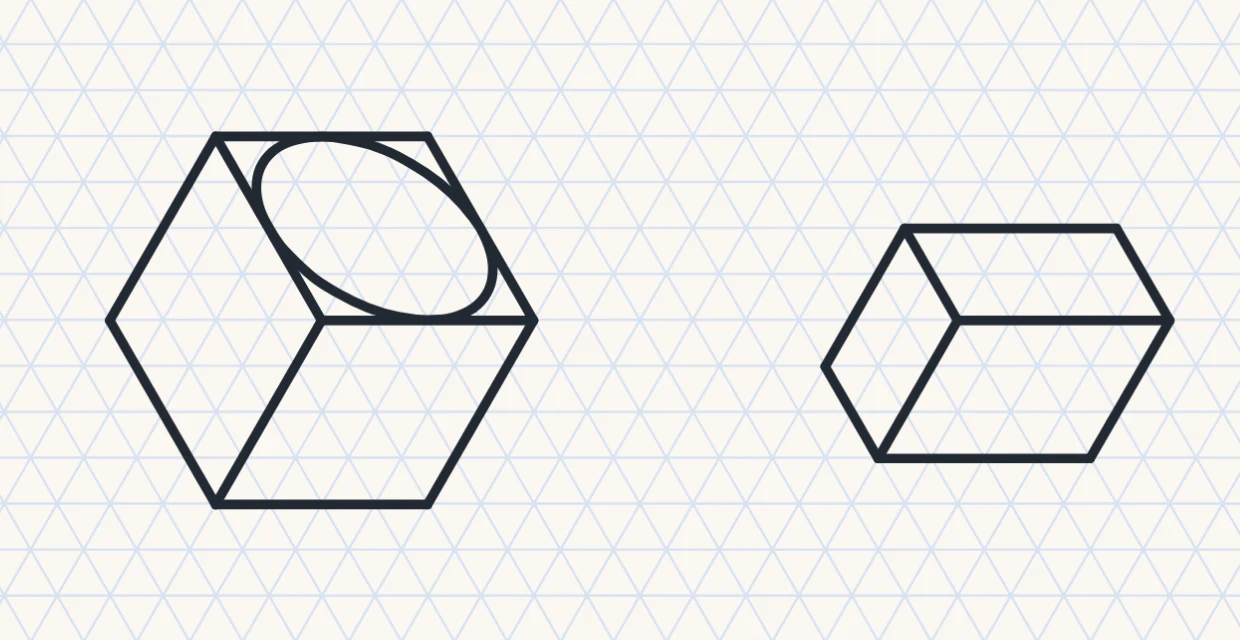
To draw an isometric drawing, start at the corner of the shape nearest to you and draw three edges from it, one along each direction of the isometric grid. Then draw the edges parallel to those three, and leave out any edge hidden behind the shape. Every length is counted in grid units along the lines, so a cuboid 4 long, 2 wide and 3 high is 4, 2 and 3 units on the paper.
Download free isometric paper (PDF)
To practise on paper, print a free sheet: no sign-up and no email. Each comes in A4 and US Letter, with light grey lines or dots laid out like Kallydo's isometric paper.
- Isometric paper (A4, PDF) and isometric paper (US Letter, PDF)
- Isometric dot paper (A4, PDF) and isometric dot paper (US Letter, PDF)
Print at actual size, not "Fit to page". To draw online instead, open isometric paper on the demo board.
What is an isometric drawing?
It is a way of showing a solid in three dimensions on flat paper. The three directions of the solid (length, width and height) are drawn as three directions on the page, each 120° from the others. Edges that are parallel on the solid stay parallel in the drawing, and lengths along those three directions are drawn to the same scale, so you can measure them.
Isometric paper does the angles for you. Its lines run in exactly those three directions, so drawing along the lines and counting the spaces between the points is all it takes.
A note on Kallydo's isometric paper
Most printed isometric paper has vertical lines and lines at 30° to the horizontal. Kallydo's isometric paper is the same grid turned a quarter-turn: its lines run horizontally and at 60°. The clips below were drawn on it, so the shapes come out turned the same way, with the edges you would usually draw vertically running across the page. The method is exactly the same on both, and every step below works on either kind of paper.
How do you draw a cube on isometric paper?
Draw the three edges that meet at the nearest corner, then the six edges parallel to them. A cube with sides of 4 units needs 4 spaces along each line.
- Pick a point on the grid for the corner nearest to you.
- Draw three edges from it, one along each direction of the grid, each 4 units long.
- Draw the parallel edges. From the end of each edge, draw edges parallel to the other two, 4 units each, until they meet.
- Check the outline. A cube drawn this way is a hexagon with a Y shape inside it. If any edge does not lie on a grid line, recount from the corner.
Only three faces of a cube can be seen at once, so the three edges at the back corner are hidden. In an isometric drawing they are usually left out. If you want to show them, draw them dashed.
How do you draw a cuboid with given measurements?
The same way as a cube, with a different number of units in each direction. For a cuboid 4 units long, 2 wide and 3 high, draw the three edges from the nearest corner as 4, 2 and 3 units, then draw each parallel edge the same length as the one it copies.
Count the spaces between grid points, not the points themselves. An edge 4 units long touches 5 points, and counting points is the most common reason a cuboid comes out one unit too long.
The same idea builds more complex solids. An L-shaped block or a set of steps is a group of cuboids drawn against each other: draw the nearest one first, then add the others, and rub out the edges that the front blocks hide.
How do you draw a circle in isometric?
A circle on a face of the solid becomes an ellipse. Draw the square around the circle first: in isometric it is a rhombus. Mark the middle of each of its four sides, then draw a smooth oval that touches all four marks.
- Draw the face as a rhombus, using the grid lines.
- Mark the midpoint of each side. The circle touches the square at these four points, so the ellipse must touch the rhombus there too.
- Draw the ellipse through the four marks. It is longest towards the two sharp corners of the rhombus, curving tightly there, and flatter towards the two wide corners.
The long axis of the ellipse points at the two sharp corners of the rhombus. An ellipse that points the other way, or that crosses a side instead of touching it, is the usual sign that the midpoints were skipped.
What mistakes should you watch for?
- Lines off the grid. In an isometric drawing every edge of a box-shaped solid lies along one of the three grid directions. A line that cuts across the grid is either a sloping face or a mistake.
- Mixing isometric with oblique drawing. An oblique drawing keeps the front face as a flat square and draws the depth at 45°. Isometric has no flat front face: all three visible faces are drawn as rhombuses or parallelograms.
- Counting points instead of spaces. See the cuboid above.
- Drawing the hidden edges solid. Either leave them out or draw them dashed, so the solid does not look like a wire frame.
Why draw on isometric paper online?
Because a drawing that has to be redrawn costs a lesson's worth of time. On an online whiteboard with isometric paper, you can draw a solid while a student watches, rub out an edge without spoiling the rest, and send the page as a PNG or a PDF when the lesson ends. In Kallydo you choose the paper page by page, so a lesson can put an isometric page next to a ruled page of working. How isometric paper compares with graph, grid and dot paper, and how to choose the paper for a page, is in free online graph paper, and why Kallydo has isometric paper at all is in why we built Kallydo.
Try isometric paper
The Kallydo demo board is a working whiteboard that runs in your browser, with no account and no sign-up. It opens on isometric paper, so you can draw the cube from this post straight away: three edges from the nearest corner, then the parallel edges.